21 May 2017
If you ever had the need to add syntax specifications to your document,
you basically have two options: Either write down the syntax in the
Backus-Naur form (BNF) (or
one of its derivatives) or opt for a more graphical approach by adding
“railroad diagrams”. In my
opinon, the latter are easier to grasp for less
experienced readers and also look quite nice.
In LaTeX, you can use the rail package to
generate those diagrams from
EBNF
rules:
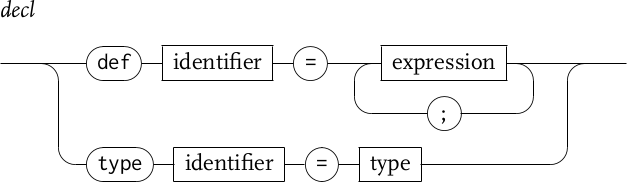
\begin{rail}
decl : 'def' identifier '=' ( expression + ';' )
     | 'type' identifier '=' type
     ;
\end{rail}
This will result in something like this:
To archieve this, the package first generates a *.rai file. We then have
to convert the rai file to a *.rao by invoking the accompanying C
program named rail.
However, the rail package is fairly old. It has been written by
Luc Rooijakkers in 1991 (!) and was updated by Klaus Barthelmann until 1998.
Thus, the code is – at least – 19 years old and that really shows: Trying
to compile it on modern systems yields a bunch of compilation errors.
Most of the issues stem from missing return types in function declarations
and also missing forward declarations.
I stepped up and fixed these issues, so that it works with a up-to-date
compiler (I tested with gcc (GCC) 6.3.1 on
Arch Linux. You can find the result on
Github.
I also threw in some Makefile improvements into the mix: You can now use
DESTDIR and
PREFIX (defaults to /usr/local) when running make install.
Installation
Installation should be fairly straighforward. Here’s an example which will
install rail into /usr:
$ curl -L https://github.com/Holzhaus/latex-rail/archive/v1.2.1.tar.gz | tar xzvf -

$ cd latex-rail-1.2.1

$ make
bison -y  -dv gram.y
gram.y: warning: 2 reduce/reduce conflicts [-Wconflicts-rr]
cmp -s gram.c y.tab.c || cp y.tab.c gram.c
cmp -s gram.h y.tab.h || cp y.tab.h gram.h
gcc -DYYDEBUG -O   -c -o rail.o rail.c
gcc -DYYDEBUG -O   -c -o gram.o gram.c
flex  -t lex.l > lex.c
gcc -DYYDEBUG -O   -c -o lex.o lex.c
gcc -DYYDEBUG -O rail.o gram.o lex.o -o rail

$ sudo make PREFIX=/usr install
$ sudo mktexlsr
Please note that installing stuff using sudo make install will circumvent
your package manager and is usually not a good idea. If you’re using
Arch Linux you should use the
AUR package instead:
Manual compilation and Latexmk support
To generate a document manually, you need to run multiple commands:
- Run
latex mydoc, which will create mydoc.rai
- Run
rail mydoc to generate mydoc.rao from mydoc.rai
- Run
latex mydoc for the final document
If you don’t want to bother with running LaTeX multiple times, you can
use latexmk, a perl script to automate
the document generation.
To make it work with the rail package, you should create a .latexmkrc
in your document folder with this content:
push @file_not_found, '^Package .* Info: No file (.+) on input line \d+\.';
add_cus_dep('rai', 'rao', 0, 'rail');
sub rail {
   my ($base_name, $path, $ext) = fileparse( $_[0], qr/\.[^.\/]*/ );
   pushd $path;
   my $return = system "rail $base_name";
   popd;
   return $return;
}
The first line will add the appropriate RegEx to Latexmk’s missing file
detection, the second line will instruct latexmk to run the rail subroutine
with a *.rai file as input and *.rao file as output.
Alternatives
I you don’t quite like the rail package, you might want to look into
one of these alternative packages:
These also an
online tool to generate railroad diagrams if
you don’t want to do it in LaTeX.
10 Aug 2016
In case you rely on Windows-only software or want to play a game that isn’t on Linux yet, you might want to keep Windows 7 on a second partition. Although I didn’t use it for months, I still keep one around just in case.
Unfortunately, it’s not really straightforward to create a UEFI bootable USB installation disk without using Windows. For some strange reason we can’t just dd the ISO image to a USB disk. Instead, we need to use the Windows USB/DVD Download Tool which - incidentally - only runs on Windows.
However, there’s also a way to do this from Linux:
First, you need to create a GPT partition table with a FAT32 partition on your USB pen drive. Then you simple mount the ISO file and copy the files over. After you’ve done that, your need to extract the file 1/Windows/Boot/EFI/bootmgfw.efi from the install.wim file inside /sources folder on the Windows 7 installation ISO and move the extracted file to /EFI/Boot/bootx64.efi on the pen drive.
You don’t have to do this manually: There’s a neat little tool called WinUSB that can do this for you (it even has a GUI if you want it) and my pull request) that adds Windows 7 UEFI support support has just been merged.
06 Jul 2015
My university’s website for exam enrollment needs smardcard authentification, but only contains instructions how to use it with Mozilla Firefox. If you prefer Chrome/Chromium over Firefox and don’t want to keep a Firefox installation around, you can do so - here are the instructions.
OT: The Ruhr-University of Bochum (RUB) uses two different systems for exam enrollment, VSPL and FlexNow. The reason for using two different, incompatible systems surpasses my understanding. I was very happy that my faculty uses FlexNow, which is browser-based, rather than VSPL, which only works via a proprietary, Windows-only client (even though the download page for that application used to show a hip student with a MacBook… oh, the irony). Anyway, VSPL recently got a web-interface, too, so if you have to use VSPL, you can also use Firefox or Chromium now.
Since I’m using ArchLinux, I’ll base my instruction on that, but any other distro also should work fine if you accomodate package names and file paths.
You’ll need a CCID-conformant smardcard reader (this is the one I am using, but the “official” reader that the university sells works too).
First, we need the software - apart from chrome that is the CCID-driver, the OpenSC-library and Mozilla’s Network Security Services:
# pacman -Sy ccid opensc nss
Next, we need to add the PKCS#11 module from OpenSC to the Chromium NSS module. Quit Chromium if necessary and run:
$ modutil -dbdir sql:.pki/nssdb/ -add "opensc" -libfile /usr/lib/pkcs11/opensc-pkcs11.so
You can verify that everything worked by running:
$ modutil -dbdir sql:.pki/nssdb/ -list
It should print a listing of PKCS#11 modules. If your smardcard driver is attached, one of the slots of the opensc module shows the name of your smardcard reader. If you also plugged in your smardcard, the according token tells you what smardcard has been detected.
Listing of PKCS #11 Modules
-----------------------------------------------------------
  1. NSS Internal PKCS #11 Module
   slots: 2 slots attached
  status: loaded

   slot: NSS Internal Cryptographic Services
  token: NSS Generic Crypto Services

   slot: NSS User Private Key and Certificate Services
  token: NSS Certificate DB

  2. opensc
  library name: /usr/lib/opensc-pkcs11.so
   slots: 2 slots attached
  status: loaded

   slot: Virtual hotplug slot
  token:

   slot: Hewlett-Packard Company HP USB CCID Smartcard Keyboard [HP USB C
  token: Student Card (User Pin)
-----------------------------------------------------------
That’s it.
If you now start Chromium and click “Manage certificates” button in the HTTPS/SSL section of Chromiums settings (Settings -> Show advanced settings…), you should see your smartcard certificate in the “Your certificates” tab.
You can now log into FlexNow (or VSPL), de-register all you exams and chill.
11 Jun 2015
When I decided to replace my beloved Raspberry Pi media center with something more powerful, I didn’t expect so many issues. I purchased Hardkernel’s ODROID-C1 and was rather excited. The Kodi Entertainment Center worked much smoother than before (especially since I compiled it to use the Framebuffer instead of X11). I’m even able to play a lot of retro games (not all though) at full speed via emulators for Sony Playstation, Sega Genesis, Dreamcast and Nintendo’s SNES, NES and N64 consoles.
But after some time, I figured there were still some problems that I were unable to fix on my own.
This super-annoying issue for example: Occasionally, the audio would drop for 1 or 2 seconds - sometimes only once or twice during a 2 hour movie, sometimes every 2 minutes. I was not the only one with this issue when I reported it at the start of February. But it took quite some time, until this was fixed. The main problem here: The hardware vendor, Amlogic, writes really crappy code. I had a look at their kernel sources and their code quality is so poor that I wonder why this stuff even works most of the time. At least, Amlogic seems to embrace Open Source Software (which can’t be said about some other vendors) and sent a patch to Hardkernel.
Another issue was fixed too. The CEC implementation on the C1 is kinda broken (hardware-wise), so you’re unable to control Kodi with your TV remote. You still can do this via the built-in IR receiver, but since my C1 sits inside a closed cupboard, this was not an option for me. You can fix the CEC-Issue yourself with some soldering, but fortunately, some devices even work without any soldering. All you need is to install RTC battery and hope for the best. In my case that worked.
Finally, after more than 4 month, I can finally use this little device as a fully-featured media center.
09 Apr 2015
It’s past 6 o’clock in the morning and - while writing this blog post - I’m wondering why manufacturers seem unable to implement stuff properly. If I had known what pain UEFI would cause me, I would have sticked to my good ol’ BIOS boot setup.
But first things first: Since I wanted to play some games with my friends, I decided to boot the fallow Windows 7 partition that I had set up for this very purpose. I’m using ArchLinux almost exclusively, thus I never booted that partition after installation.
So Windows was booting… All of a sudden, the infamous Blue Screen of Death appeared and my Laptop rebooted. “Shoot!”, I thought. I still cannot think of any valid reason why this BSOD occured in the first place. How did Windows managed break down without even being booted? Anyway, after various failed attempts to fix it (including Windows Startup repair, safe mode and recovery console), I eventually gave up and faced the inevitable: I had to reinstall Windows.
After struggling with the Windows installer (which first refused to install to my GPT-partitioned hard disk because for some reason it always started in legacy BIOS mode), I finally succeeded. Unfortunately, Microsoft - as the ultimate authority of enlightenment - is destined to enforce their commandments, including “I am Windows thy OS, Thou shalt have no other OS before me”. Therefore, it just overwrote my existing boot manager rEFInd and replaced it with it’s own one, so that I was unable to boot into Linux.
Since I was using UEFI (mainly because I was curious, it doesn’t really make sense from a security standpoint), I was actually able to reboot and quickly press the F9 key on my HP ProBook 6465b to select a boot device. One of the options was to select an EFI file to boot, which at least enabled me to boot Linux at all, but than can only be a temporary solution.
Now the real pain began: First, I tried to get back rEFInd by using Windows’ bcdedit. I downloaded it and followed the steps here, but to no avail:
C:\> mountvol S: /S
C:\> cd \Users\jan\Downloads\refind-bin-0.8.7
C:\> xcopy /E Users\jan\Downloads\refind-bin-0.8.7\refind S:\EFI\refind\
C:\> S:
S:\> cd EFI\refind
S:\EFI\refind> rename refind.conf-sample refind.conf
S:\EFI\refind> bcdedit /set {bootmgr} path \EFI\refind\refind_x64.efi
S:\EFI\refind> bcdedit /set {bootmgr} description "rEFInd Boot Manager"
It kinda worked, and there was no error message, but Windows still kept booting instead of rEFInd.
So, I rebooted into Linux to restore my boot manager via efibootmgr. But that still didn’t work, because the new boot entry that I added immediately disappeared.
# efibootmgr -c -d /dev/sda -p 1 -L "rEFInd" -l /EFI/refind/refind_x64.efi
Next step: Compiling the EFI Shell v2 in order to use bcfg to edit my boot entries. After compiling, rebooting, pressing F9 and selecting the shellx64.efi file, the next disappointment awaited me:
ASSERT_EFI_ERROR (Status = Not Found)
After some googling, I found the cause of this: The UEFI implementation my ProBook uses is too old to be compatible with the EFI Shell v2. Using EFI Shell v1 was no option either, since it lacks the bcfg tool that was the reason to boot the shell in first place.
Now I was a bit baffled to say the least.
After massive googling, I finally found the single most ridiculous way I can think of to get my beloved rEFInd setup back: **drum roll**
Some very bad UEFI implemtations apparently expect the *.efi file to boot at EFI/Microsoft/Boot/bootmgfw.efi. So I mounted my EFI System Partion at /esp:
# mkdir /esp
# mount -t vfat /dev/sda1 /esp
Then I moved my Windows *.efi files to a newly created folder, moved my refind to EFI/Microsoft/Boot/bootmgfw.efi and renamed refind_x64.efi to bootmgfw.efi:
# cd /esp/EFI/Microsoft
# mkdir Windows
# mv Boot Windows
# mv ../refind Boot
# mv Boot/refind_x64.efi Boot/bootmgfw.efi
And - to my surprise - it actually worked. Simple as that. Wow. I just needed to adapt my refind.conf to the new path of the Windows bootloader (since I disabled to autodetection of efi files in favor of manual entries), but that’s it. I finally finished getting my usual boot setup back.
I still don’t know who I should condemn more: Microsoft for still replacing the boot manager without even asking or HP for putting such a crappy UEFI implementation into my Laptop. But one thing I know: Next time I reinstall my PC, I’ll choose Legacy BIOS instead of UEFI.