How Does Timecode Vinyl Actually Work? (Pt. 1)
Sun 21 November 2021This is a mirror of a blog post that was published on the website of Mixxx, an open-source DJ software. You can read the original post over at mixxx.org.
Since the dawn of DJing, spinning vinyl records has never really gone out of fashion. Even when CDs became popular in 90s and most music listeners happily phased out their record players, the classical "two turntables and a mixer" setup stayed the epitome of DJing. In recent years, digital DJ controllers became more popular, but there are still many DJs that stick with their notorious Technics SL-1210s turntables.
There's a reason for that: the tactile feeling of manipulating music with your hands is something that controllers have had trouble achieving. Motorized controllers like the Rane One try to provide a similar workflow, but it's still to be seen whether they will be able to take significant market share and replace vinyl setups or if they stay a niche product.
On the other hand, going digital has its benefits: In contrast to the 80s, nowadays many tracks are only released digitally, and a pure vinyl setup makes it impossible to play them. Jumping to different positions instantly inside a track using hotcues - without picking up, moving and dropping the needle - just isn't possible with vinyl records, and carrying around heavy crates of records isn't the best you can do for your back either.
Digital Vinyl Systems (DVS) aim to provide the best of both worlds by combining the flexibility and power of digital DJing with the tactile control of traditional vinyl DJing. But how does it actually work?
The Basics
Instead of a traditional record that contains music, a "control" record is used. Such a record contains a special signal that is processed by the computer. The computer transforms this signal into information about direction ("Is the record playing forwards or backwards?"), pitch ("How fast is the record spinning?") and position information ("At which position of the record is the needle?") and uses it to manipulate the playing track in software.
There are many formats out there: VirtualDJ, Rekordbox, Numark, MixVibes, Traktor and Serato all provide their own solution. Mixxx (and the underlying xwax library) support the latter 3 formats.
Serato is one of the most popular and robust digital vinyl systems. The Serato Control CD can be used to achieve the same thing on CDJs instead of turntables. Since the latter essentially works the same as the vinyl version and can be downloaded for free from the Serato Website, I'm going to explain how it works based on that format.
Let's take a look at the control signal (also called "timecode signal"). If you open the WAV file with an audio editor like Audacity, it looks like this:

As you can see, the timecode signal is a stereo signal. The left channel is on top and the right channel is on the bottom. Both channels look very similar, but the right channel is shifted a little.
Detecting the Playback Velocity
Let's focus on the left channel for now. The wave basically looks similar to a sine wave that you may remember from your high school math classes. You can divide that signal into "cycles", where each cycle starts from zero and goes into a positive part (above the black line) followed by a negative part (below the black line) and then repeats:
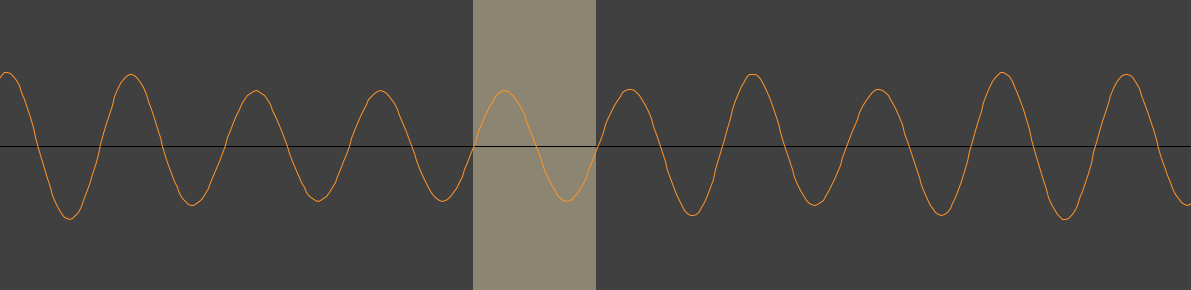
Each cycle has the same length and if we count the number of cycles in a single second of audio, there are 1000 of them. Hence, we now know that the signal has a frequency of 1000 Hz (Hz = 1/s, so it's basically a fancy way saying "per second").
With that information, the DVS system can detect how fast the record is playing by checking how many cycles there are in a second of audio recorded from the turntable. If there are 2000 cycles per second, it's playing a double speed, at 500 cycles per second the record is playing at half speed, and so on.
But how does the computer know how many cycles there are in a second? We can't actually wait for a second, because the delay (also called latency) would be very noticeable and make the system unsuitable for scratching.
Analog vs. Digital Audio
It's important to know that in contrast to analog audio like vinyl or music cassettes, the computer doesn't actually work with the continuous (smooth) wave that we see in the screenshot.

Instead, digital signals work with measurements (called "samples") that indicate the value of the wave position at specific points in time. How often these measurements are taken is determined by the sample rate (or sampling rate). For example, Audio CDs use a sample rate of 44100 Hz (i.e. 44100 measurements per second, or 1 measurement every ~22.68 microseconds). Such a signal is called "time-discrete":

The reason for this is that a time-continuous signal has infinite resolution and would need infinite memory space to save, which is impossible - and also unnecessary, because as long as you take enough samples per second, you can restore the original signal without any loss of information.
Since computers can't store numbers with a theoretically infinite number of different values, a digital signal is also value-discrete. This means that the amplitude values are mapped to a finite number of different values.
Let's assume we only have space to store 11 distinct values per sample (-1.0, -0.8, -0.6, -0.4, -0.2, 0, 0.2, 0.4, 0.6, 0.8 and 1.0). But a sample value may have any value, so if its value would be between two of these values, they have to be rounded (in this case: multiples of 0.2). This process is called Quantization and causes some information loss, which means that it adds noise to our signal. An example for such a quantized, value-discrete version of the analog signal looks like this:

A more realistic example is the Audio CD, which uses 16 bit per sample value. With 16 bits, you can represent 216 = 65536 different values.
A digital signal is both time-discrete and value-discrete:

Note that this is just a very basic introduction in how digital signals are represented. If you're interested in the topic, I recommend watching Monty Montgomery's "Digital Show & Tell" video, where he demonstrates how digital signals behave in contrast to analog ones and clears up common misconceptions.
You may wonder why the timecode signal in the screenshots looks like a analog signal instead of a "lollypop chart". Digital vinyl scratch system work with digital signals, not analog ones, right? And you'd be right, it's just that most audio tools (like Audacity) show a wave instead of individual samples by default.
Detecting Zero Crossings
Now that we know the basics of digital audio, we can start thinking about a simple low-latency approach to detect the playback velocity using so-called "zero crossings".
Whenever the wave goes from the positive part to the negative part or vice-versa, it crosses "zero". For example, in the timecode signal screenshot I used above, we can see 3 zero crossings:
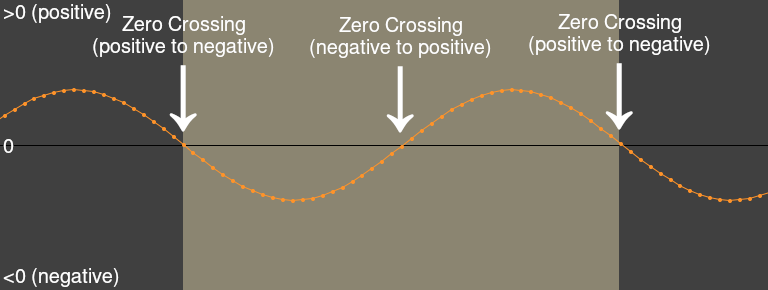
Note that we're working with a digital signal. To illustrate that this signal is time-discrete, each individual sample value is illustrated by a little dot.
To detect these zero crossings reliably, we can't just check if the sample value equals zero, because we cannot assume that a sample measurement is happening at the exact time that the signal is at zero position.
It might be the case the current sample is after the zero position and the previous sample was before the zero position. Hence, we also compare the previous sample value with the current sample value. If the current value is positive and the previous value was negative, or if the previous value was negative and the current value is positive, the signal crossed zero.
Refining Pitch Detection Using Zero Crossings
Now that we know how to detect zero crossings, we can use them for determining the pitch.
If we look at the timecode signal, we can see that each cycle of the timecode signal has two zero crossings: At the start of the cycle, when the positive part of the wave starts and in the middle of the cycle when the negative part of the wave starts.
So the equivalent of checking for 1000 cycles per second is to check if there are 2000 zero crossings per second. Let's say the audio interface uses a sample rate of 44100 Hz, then there should be a zero crossing every 441000 / 2000 = 22.05 samples.
We can now detect the pitch by comparing the expected number of samples between zero crossings with the actual number of samples between them. This very simple, low latency pitch detection algorithm works because the Serato timecode has a fixed frequency of 1000 Hz, which means that the distance between all zero crossing is fixed. It would not work with a regular music signal, which has lots of different frequencies added together.
However, we need to use multiple sample distances and calculate the average to make this calculation more accurate, because in reality there are no fractions of samples, only full samples.
Detecting the Playback Direction
The DVS system also needs to know if the record is playing forwards or backwards.
To do that, we need to take a look at the right channel. It's basically the same signal as the left channel, but as we noticed before, it's shifted by a quarter cycle. This means that whenever there's a negative or positive amplitude peak in the left channel, the right channel is at zero.
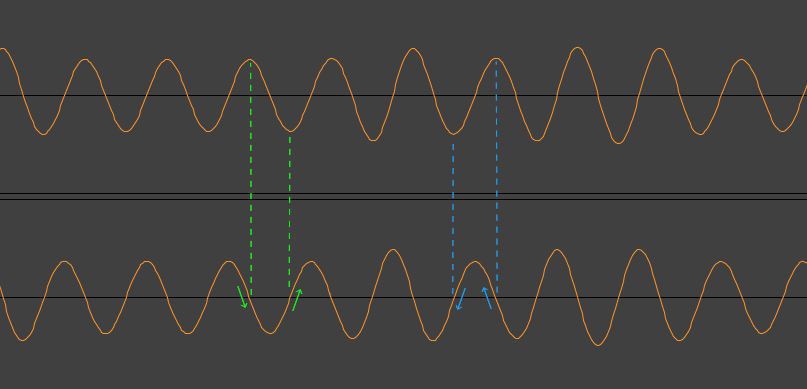
We can use this property to detect the playback direction. After the left channel crossed zero, we check if the left and right channel waves are both positive or both negative. If so, the record is playing forwards, otherwise it's playing backwards.
For the right channels it's the opposite. After the right channel crossed zero and the left is negative and the right is positive or if the the right is negative and the left is positive, the timecode is playing forwards. If both waves are positive or both are negative, the record is playing backwards.
Now we have already have the basic building blocks to make a DVS system with a simple relative mode.
For a DVS system that allows you to skip forward and backward in a track by picking up and moving the needle (absolute mode), we need a way to detect the current position in the timecode signal. I'll explain how that works in the next post.